With fall comes fresh pumpkin pie, visits to the pumpkin patch and pumpkin carving. Why not make your very own version of the orange veggie to hang in your window this autumn season?
What you'll need:
- Orange craft foam
- Green craft foam
- Brown chenille stick
- Brown or black marker
- Suction cup hanger
- Orange glitter glue
- Paintbrush
- Scissors
- Hot glue gun
- White craft glue
- Pattern
How to make it:
- Trace the pattern onto orange craft foam and cut out.
- Cut out leaves from the green craft foam and use white glue to adhere the leaves to the top of the pumpkins.
- Use a marker to draw lines onto your pumpkins.
- Let the glue dry.
- Cut a four inch piece off the chenille stick and save the remainder for another project. Fold the four inch piece in half, creating a loop at one end.
- Hot glue the open end of the chenille stick to the back of the pumpkin for the stem, leaving about one inch showing with the loop at the top.
- Paint pumpkins with orange glitter glue and let them dry.
- Attach suction cup to a window and hang pumpkin by the stem.
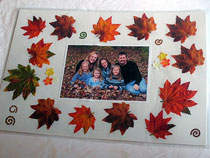
PICTURE PLACEMAT
This fun keepsake pulls double duty as a useful placemat for meals and a great way to display your favorite family photos. These make great gifts for Grandma and other relatives as well.
What you'll need:
- 1 sheet white craft foam
- Clear contact paper
- Silk or real leaves
- 5” x 7” photograph
- A few tiny silk flowers
- Hot glue gun
- White craft glue
- Paper cutter or scissors
How to make it:
- Glue photo to the center of the white foam. Use a sponge applicator or your finger to spread the glue evenly on the back of the photo so that there are no bumps or lumps.
- Use a hot glue gun to decorate the “frame” around the photo with leaves. If you’re using real leaves, make sure they are bug free and not too dried out or they may crumble.
- Add a few tiny silk flowers around the frame. You can also use some whimsical fall stickers if you like.
- Cover both sides of the foam placemat with contact paper. Make sure you follow manufacturer’s instructions.
- Trim the edges, leaving about ¼” of the contact paper over the edges of the foam.
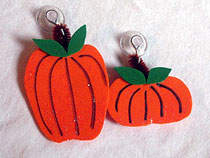
PUMPKIN WINDOW HANGER
PHOTO PLACEMAT